

This post may contain affiliate links, meaning I may earn a commission if you make a purchase, at no extra cost to you. I only recommend products I trust. Thank you for your support.
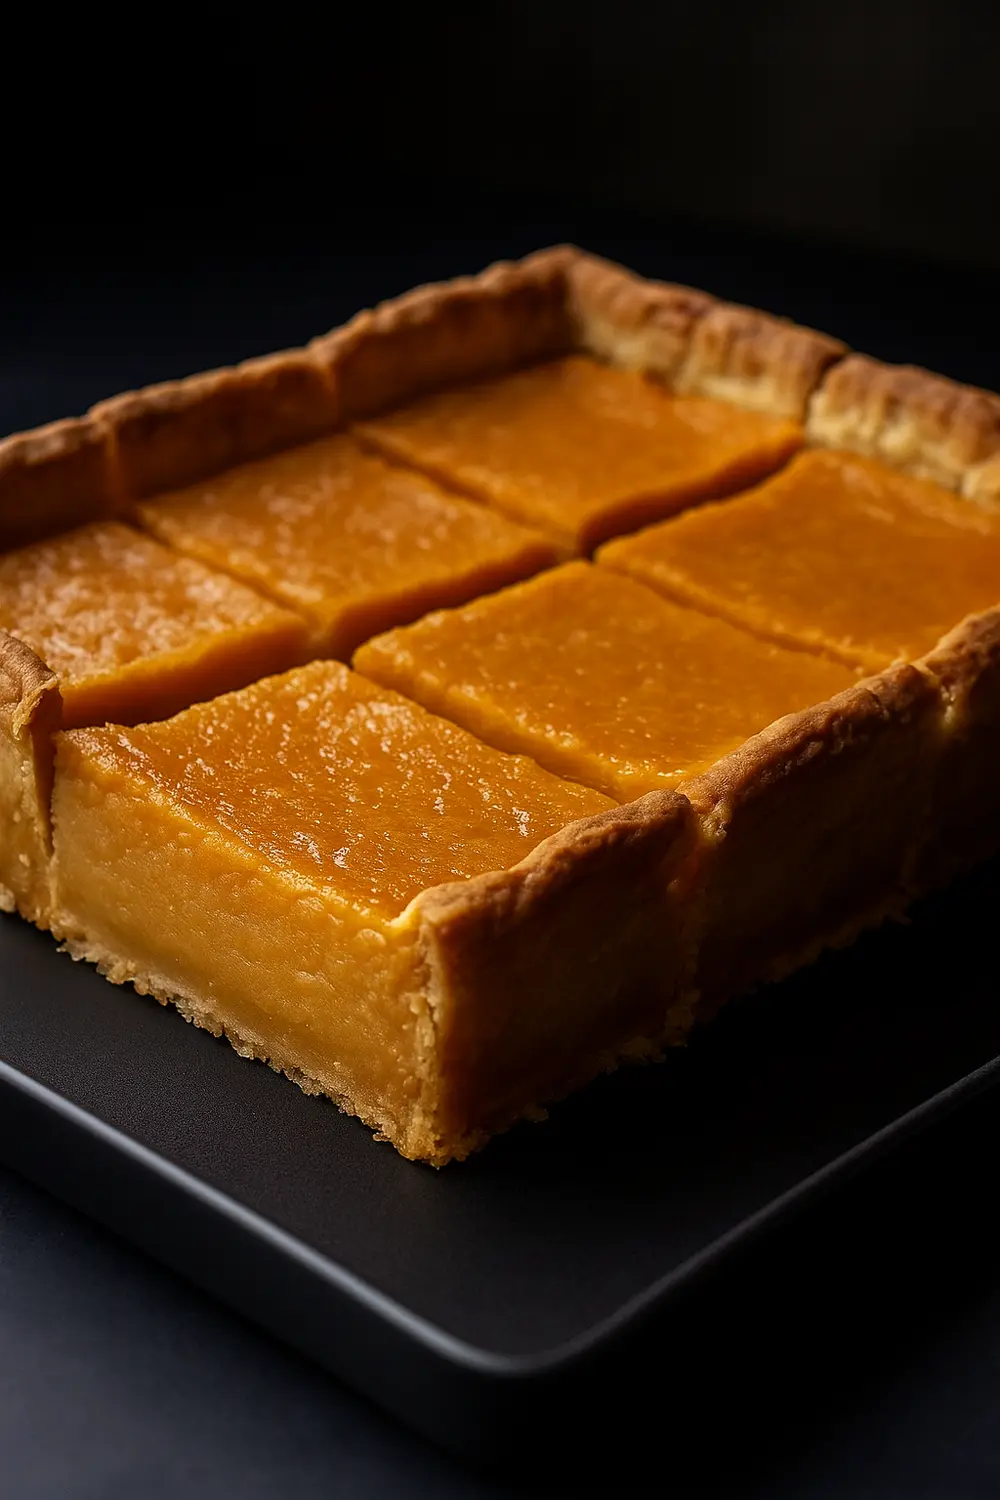
These sweet potato bars feature a rich, golden-orange filling that’s perfectly spiced and irresistibly smooth, nestled in a sturdy, golden-brown buttery crust.
Our sweet potato bars are more than just a dessert; they are a testament to how classic comfort can meet modern ease, making them a perfect grab-and-go treat or a sophisticated addition to any spread.
They are a versatile treat that fits seamlessly into various occasions, from a comforting fall gathering to an elegant addition to Thanksgiving pie bars.
The beauty of these sweet potato pecan pie bars lies in their ability to evoke a sense of nostalgia, reminiscent of old fashioned sweet potato pie bars, while simultaneously offering significant nutritional advantages.
They are an excellent source of Vitamin A, providing a remarkable 100% of the Daily Value per serving in some bar formulations.
Furthermore, sweet potatoes are packed with antioxidants, which play a vital role in combating oxidative stress within the body.
Their natural sweetness means that this sweet potato pie bar recipe often requires less added sugar compared to many other desserts, allowing the inherent goodness of the sweet potato to shine through.
✅ Read the entire article to ensure you’re fully prepared with all the necessary equipment and ingredients. The full recipe and cooking instructions are below.
Key Ingredients for this Sweet Potato Bar Recipe
Crafting the perfect sweet potato bars relies on a thoughtful selection of ingredients that build layers of flavor and texture. Here’s a closer look at the stars of this sweet potato pie bar recipe:
1. For the Golden Buttery Crust:
- All-Purpose Flour: This forms the structural base of your crust, providing the necessary gluten for a cohesive yet tender foundation.
- Cold Unsalted Butter: The secret to a flaky, tender crust! When cold butter is cut into the flour, it creates pockets that release steam during baking, resulting in that desirable light texture.
- Granulated Sugar: Adds a touch of sweetness to the crust, balancing the richness of the butter.
- Salt: A pinch of salt enhances all the other flavors in the crust, preventing it from tasting flat.
2. For the Sweet Potato Filling:
- Cooked Mashed Sweet Potatoes: The heart of the bars! Roasting them is highly recommended to concentrate their natural sweetness and achieve a drier, fluffier mash, which is crucial for a rich, non-watery filling.
- Melted Unsalted Butter: Adds richness and a smooth mouthfeel to the filling.
- Large Eggs: Act as the primary binder, creating the classic custard-like consistency that sets the filling.
- Light Brown Sugar: Adds sweetness along with a subtle molasses flavor, giving the filling a warm, rich, and slightly caramel-like depth that complements the sweet potato perfectly.
- Vanilla Extract: A classic flavor enhancer that brightens and complements the sweet potato and spices.
- Ground Cinnamon, Nutmeg, & Ginger: This trio of warm spices is essential for that quintessential sweet potato pie flavor, adding depth and aromatic complexity.
- Pinch of Salt: Balances the sweetness and enhances the overall flavor profile of the filling.
- Optional for Extra Creaminess: A splash of heavy whipping cream or whole milk (or even fat-free half-and-half ) can make the filling even more luxurious and velvety.
3. Toppings (Optional):
- Miniature Marshmallows: For a classic, toasted sweet potato casserole vibe.
- Chopped Pecans or Walnuts: Provide a delightful crunch and nutty flavor.
- Cinnamon-Oat Streusel: A crumbly, spiced topping that adds texture and warmth.

Equipment Needed for Making Sweet Potato Pie Bars
Having the right kitchen tools at your disposal makes the baking process smoother and more enjoyable, ensuring professional-looking results. Here’s what you’ll need:
- 9×13-inch (23×33 cm) Baking Pan: This standard size is perfect for baking a batch of bars that can be easily cut into individual servings. A glass or ceramic dish is often preferred for even heat distribution.
- Parchment Paper: Crucial for lining the baking pan, allowing for effortless lifting and removal of the entire slab of bars once cooled, preventing sticking.
- Large Mixing Bowls (2-3): You’ll need separate bowls for preparing the crust ingredients, the sweet potato filling, and for combining various components.
- Whisk: Essential for thoroughly blending dry ingredients, lightly beating eggs, and ensuring smooth mixtures.
- Pastry Blender or Fork: Used to cut cold butter into the flour mixture for the crust, creating that desirable crumbly texture. A food processor can also achieve this quickly.
- Potato Masher or Sturdy Fork: For mashing the roasted sweet potatoes until smooth.
- High-Powered Blender or Food Processor: This is a non-negotiable tool for achieving a truly silky-smooth, string-free sweet potato filling. It breaks down any fibrous strands, ensuring a luxurious texture.
- Spatula: Versatile for scraping down the sides of bowls, spreading the filling evenly, and general mixing.
- Measuring Cups and Spoons: For precise and accurate measurement of all ingredients, which is crucial for baking success.
- Wire Cooling Rack: Provides proper air circulation around the pan, allowing the bars to cool completely and evenly after baking.
- Sharp Knife: Essential for making clean, precise cuts when slicing the chilled bars into neat squares.

Nutritional Benefits of Sweet Potato Bars
These sweet potato bars are more than just a delicious treat; they offer a surprising array of nutritional benefits, making them a smart choice for a wholesome indulgence.
- Rich in Vitamin A: Sweet potatoes are an exceptional source of Vitamin A, often providing 100% of the Daily Value per serving in many bar formulations, crucial for maintaining healthy vision, supporting immune function, and promoting skin health.
- Good Source of Dietary Fiber: Each bar can contribute approximately 3 grams of dietary fiber. Fiber is essential for digestive health, helps regulate blood sugar levels, and promotes a feeling of fullness, aiding in satiety.
- Packed with Antioxidants: Sweet potatoes are rich in antioxidants, which help protect the body’s cells from damage caused by free radicals. These compounds contribute to overall cellular health and may reduce the risk of chronic diseases.
- Naturally Sweet: The inherent sweetness of sweet potatoes means that these sweet potato pie bars often require less added sugar compared to many other desserts.
- Contains Essential Minerals: These sweet potato bars also provide important minerals like iron, contributing about 2mg or 23% of the Daily Value per serving, which is vital for oxygen transport in the blood and energy production.
- Low in Cholesterol: These sweet potato bars are naturally cholesterol-free, making them a heart-friendly dessert option.
Sweet Potato Bars Toppings
While delicious on their own, sweet potato bars are a fantastic canvas for creative toppings that can add extra texture, flavor, and visual appeal.
- A Simple Dusting of Icing Sugar: For an elegant and understated presentation, a light dusting of icing sugar (confectioners’ sugar) is always a beautiful touch.
- Cinnamon-Spiced Whipped Cream: A dollop of freshly whipped cream, lightly sweetened and infused with a hint of cinnamon, provides a luxurious, airy contrast to the creamy filling.
- Vanilla Bean Ice Cream: A scoop of high-quality vanilla bean ice cream, melting slightly over a warm (or room temperature) sweet potato bar, creates a classic and comforting dessert experience.
- Pure Maple Syrup Drizzle: For an extra touch of natural sweetness and a hint of earthy flavor, a drizzle of pure maple syrup can be a wonderful addition.
- Toasted Nuts: A sprinkle of toasted chopped pecans or walnuts adds a delightful crunch and nutty depth that complements the sweet potato beautifully.
- Broiled Miniature Marshmallows: For those who love the classic sweet potato casserole topping, a handful of miniature marshmallows broiled until golden and gooey on top of the bars is an irresistible treat.
- Cinnamon-Oat Streusel: If you didn’t add it during baking, a fresh batch of crumbly cinnamon-oat streusel can be sprinkled on top for added texture and spice.

Quick Tips & Notes for Making the Best Sweet Potato Bars
Achieving perfect sweet potato bars is a rewarding experience, and a few expert tips can make all the difference. These practical pointers help ensure a delicious outcome every time.
1. Roast, Don’t Boil Your Sweet Potatoes
- For the most intense flavor and ideal texture, always opt to roast your sweet potatoes whole.
- This method concentrates their natural sugars and yields a drier, fluffier mash, which is crucial for a rich, non-watery filling.
- Boiling can introduce too much moisture, diluting flavor, and affecting the filling’s consistency.
2. Cool Sweet Potatoes Before Adding Eggs
- It is vital to ensure your mashed sweet potatoes have cooled to at least warm (not hot!) before you mix in the eggs
- Adding eggs to a hot mixture can cause the proteins to scramble, resulting in an unappealing, lumpy texture in your smooth filling.
- This step is a simple but critical preventative measure.
3. Press Crust Firmly
- When pressing the crust mixture into the baking pan, use the bottom of a flat glass or measuring cup to compact it very tightly.
- This firm pressing is key to creating a sturdy crust that will hold together beautifully when the sweet potato pie bars are sliced, preventing crumbling.
4. Don’t Overbake
- Keep a vigilant eye on your bars as they bake. The center should still exhibit a slight, gentle jiggle when the pan is lightly shaken, even if the edges appear set.
- Overbaking can lead to a dry, dense filling and may cause unsightly cracks on the surface, compromising both texture and appearance.
5. Chill, Chill, Chill
- This is arguably the most crucial step for achieving perfectly set sweet potato bars.
- Allow them to cool completely at room temperature, then transfer them to the refrigerator and chill for at least 3 hours, or ideally overnight.
- This extended chilling period allows the custard to fully set and firm up, which is essential for clean, sharp slices. Additionally, the flavors deepen and meld beautifully overnight.
6. Choosing the Right Sweet Potato
- For optimal sweetness and the ideal mashable texture, select soft, orange-fleshed varieties of sweet potatoes.
- These are often mistakenly labeled as “yams” in grocery stores but are botanically sweet potatoes, such as Beauregard or Jewel varieties.
- Additionally, opting for thinner, more uniform sweet potatoes ensures they cook evenly all the way through.
Final Remarks
These healthy sweet potato bars are a delightful exploration of how traditional comfort food can be reimagined to fit modern desires for both indulgence and well-being.
The transformation of a classic sweet potato pie into convenient bar form is not merely a change in shape; it represents an adaptation to contemporary lifestyles that value portability, portion control, and ease of consumption.
Sweet potato makes for one of the best pie bar recipes, combining its natural nutritional richness with the comforting textures of a buttery crust and a creamy, spiced filling.
So gather your tools and ingredients, follow these step-by-step instructions on how to make sweet potato bars, and feel free to share your delicious results.
Happy cooking!
Healthy Sweet Potato Bars with Buttery Crust
These healthy sweet potato bars feature a velvety, spiced sweet potato pie bar filling nestled in a rich, buttery crust, offering a perfect balance of natural sweetness and comforting flavors.
Ingredients
For the Golden Buttery Crust
For the Sweet Potato Filling
For the Topping
Cooking Instructions
Prepare the Sweet Potatoes
- Begin by preheating your oven to 400°F (200°C).
- Wash and thoroughly dry your sweet potatoes.
- Take a fork and prick them several times all over their surface.
- This simple step allows steam to escape during baking, preventing them from bursting and ensuring even cooking.
- Place the pricked sweet potatoes directly onto a baking sheet.
- Roast them for approximately 45-60 minutes, or until they are incredibly fork-tender and slightly caramelized.
- You'll know they're ready when a knife can easily slide through their thickest part with no resistance.
- Once roasted, remove the sweet potatoes from the oven and allow them to cool completely.
- Once cool enough to handle comfortably, peel off the skins; they should slip off effortlessly.
- Scoop the vibrant orange flesh into a large bowl and mash it thoroughly with a potato masher or a sturdy fork until it is as smooth as possible.
- While you're aiming for smoothness here, remember that for the ultimate velvety texture, a blender will be your best friend in a later step.
Make the Crust
- Prepare a 9x13-inch (23x33 cm) baking pan by lining it with parchment paper.
- Ensure you leave a generous overhang on the sides; this will act as convenient handles for easy removal of the entire slab of bars later.
- If you don't have parchment paper, lightly grease the pan to prevent sticking.
- Pulse the all-purpose flour, granulated sugar, salt, and cold, cubed unsalted butter in a food processor until just combined.
- Once combined, press this crumb mixture firmly and evenly into the bottom of the prepared baking pan.
- To ensure a sturdy crust that holds together beautifully when sliced, use the bottom of a flat-bottomed glass or a measuring cup to compact the crumbs down tightly.
- This firm pressing is vital for the crust's structural integrity.
Pre-Bake the Crust
- Now, reduce your oven temperature to 350°F (175°C).
- Bake the crust for 12-15 minutes, or until it appears lightly golden and set.
- This pre-baking step is essential.
- It helps to set the crust and prevents it from becoming soggy once the moist sweet potato filling is poured over it.
- A soggy crust is a common pitfall in pie bar recipes, and this step ensures your crust remains delightfully crisp.
- Remove the pan from the oven and set it aside to cool slightly while you prepare the filling.
Prepare the Sweet Potato Filling
- In a large bowl, combine your mashed sweet potatoes, melted butter, brown sugar, vanilla extract, ground cinnamon, nutmeg, ginger, and a pinch of salt.
- If you're opting for extra creaminess, now is the time to add the heavy whipping cream or whole milk.
Blend the Sweet Potato Filling
- Transfer the mixture to a high-powered blender or food processor.
- Blend until the mixture is completely smooth and uniform in color, with no visible strings or lumps remaining.
- This process usually takes only a few seconds.
- The blending step is non-negotiable for achieving that luxurious, silky-smooth sweet potato custard, free from any fibrous "stringiness" that can sometimes occur with sweet potatoes.
- Taste the mixture and adjust the sweetness if desired, adding a little more sugar if you prefer a sweeter bar.
Add Eggs to the Filling
- Pour the smooth blended sweet potato filling mixture back into the large bowl.
- Add the two lightly beaten eggs, stirring gently until they are just combined into the filling.
- It is important to ensure your sweet potato mixture has cooled slightly before incorporating the eggs.
- Adding eggs to a hot mixture can cause the egg proteins to scramble, leading to an undesirable, lumpy texture in your otherwise smooth filling.
Bake It Up
- Carefully pour the prepared sweet potato filling evenly over the pre-baked crust in the pan.
- Use a spatula to spread the filling smoothly and evenly across the crust.
- If you plan to add a streusel topping, prepare it now by combining the ingredients (often brown sugar, oats, flour, cinnamon, and cold butter cut in until crumbly) and sprinkle it evenly over the filling.
- If you're using marshmallows, you'll typically add them towards the end of the baking process or broil them on top after the bars are mostly set.
- Bake the bars for approximately 45-55 minutes.
- You'll know they are done when the edges appear set, and the center still has a slight, gentle jiggle when the pan is lightly shaken.
- Another indicator is inserting a knife into the edge of the filling; it should come out moist but clean.
- It is crucial to avoid over-baking, as this can lead to a dry, dense filling and potentially cause unsightly cracks on the surface.
- The slight jiggle indicates that the custard is perfectly set but not overcooked, ensuring a creamy texture.
Cool the Sweet Potato Bars
- Once baked, remove the pan from the oven and immediately place it on a wire cooling rack.
- Allow the sweet potato bars to cool completely at room temperature.
- This initial cooling can take 1 to 2 hours, and it's an important first step for the filling to begin setting.
- Transfer the pan to the refrigerator and chill for at least 2 hours, or ideally overnight.
- This extended chilling period allows the custard filling to fully set and firm up, which is essential for ensuring clean, sharp, and beautiful slices.
- Moreover, this resting period allows the flavors to truly meld and deepen, resulting in even more delicious sweet potato bars the next day.
Slice & Serve
- Once thoroughly chilled, use the parchment paper overhang to gently lift the entire slab of sweet potato bars out of the pan and onto a cutting board.
- Use a large, sharp knife, and remember to wipe the blade clean with a damp cloth after each cut.
- Serve your sweet potato bars plain, dusted with your favorite toppings like chopped pecans or walnuts, a dollop of cinnamon-spiced whipped cream, or a scoop of vanilla bean ice cream.

Nutrition Facts
Servings 12
Serving Size 1 bar
- Amount Per Serving
- Calories 220kcal
- % Daily Value *
- Total Fat 10g16%
- Saturated Fat 4g20%
- Sodium 90mg4%
- Potassium 250mg8%
- Total Carbohydrate 30g10%
- Dietary Fiber 3g12%
- Sugars 20g
- Protein 3g6%
- Vitamin A 1500 IU
- Vitamin C 2 mg
- Calcium 40 mg
- Iron 2 mg
* Percent Daily Values are based on a 2,000 calorie diet. Your daily value may be higher or lower depending on your calorie needs.
Note
- Mash Well: For ultra-smooth filling, use a potato masher or a sturdy fork, or a blender to press the sweet potatoes thoroughly.
- Avoid Over Baking: Filling will continue to firm up while cooling, don’t wait for it to be rock solid.
- Make-Ahead: Sweet potato bars keep 3 days in the fridge or freeze well layered between parchment in an airtight container.
- Clean Slices Every Time: This simple technique prevents dragging crumbs and filling, ensuring every slice looks as good as it tastes.
- Blend for Velvety Smoothness: Do not skip the blending of the sweet potato filling using a high-powered blender or food processor to ensure a silky-smooth sweet potato custard, free from any fibrous strands that can sometimes be present in mashed sweet potatoes.


