

This post may contain affiliate links, meaning I may earn a commission if you make a purchase, at no extra cost to you. I only recommend products I trust. Thank you for your support.
This baked strawberry swirl cheesecake marries the tang of rich cream cheese with a sweet-tart ribbon of fresh strawberries that dances through every bite.
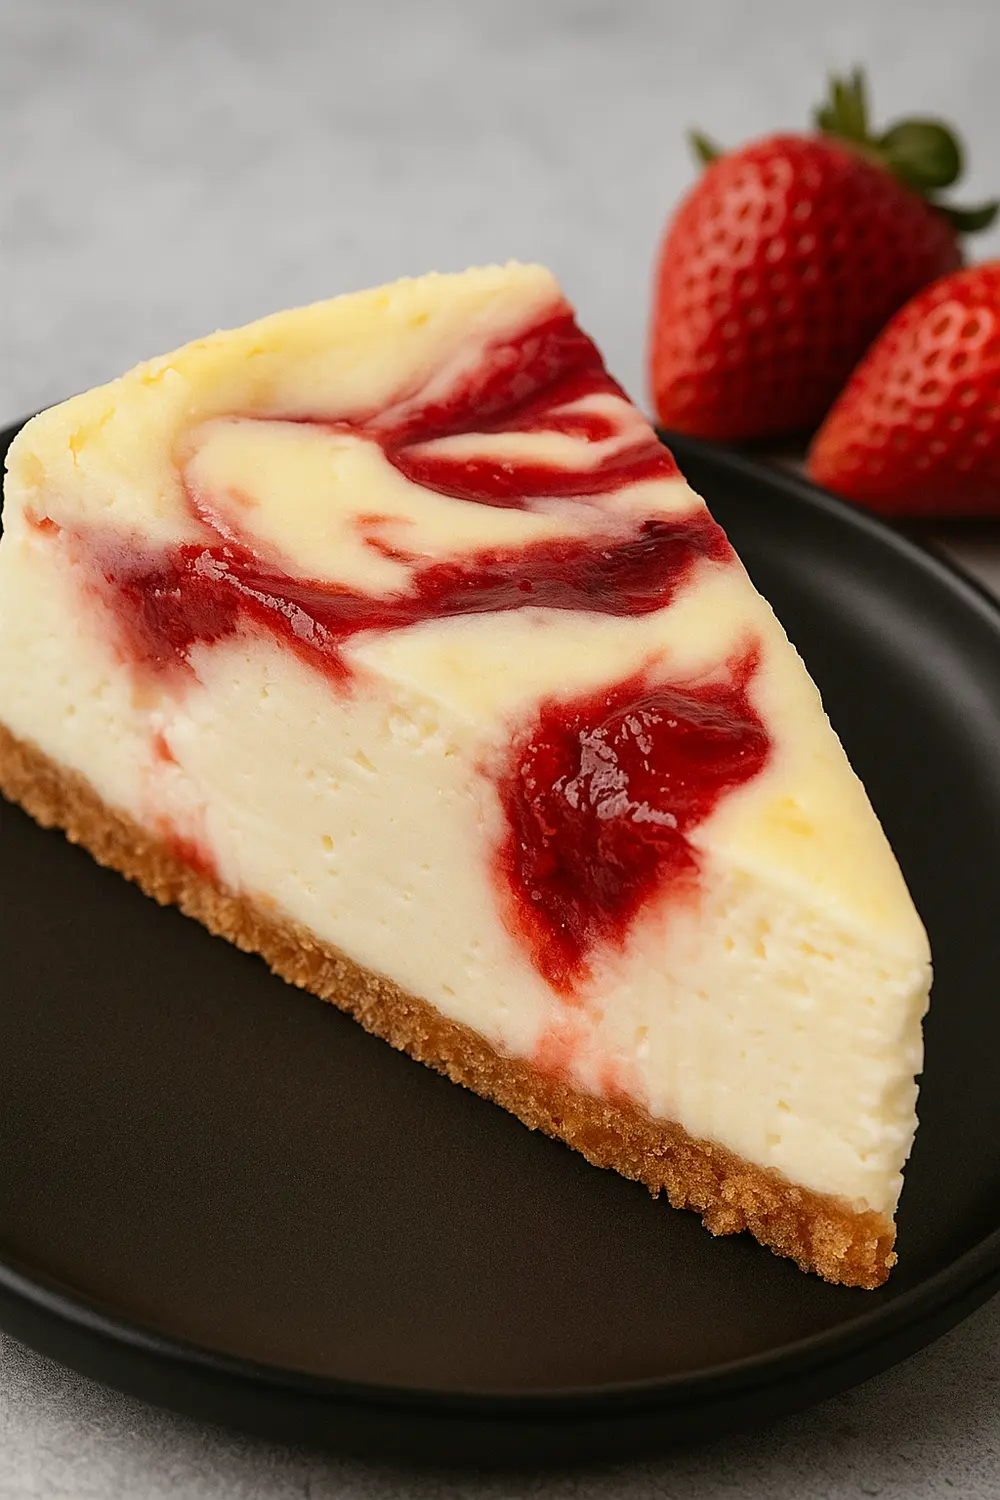
Every slice has that crisp graham cracker crust you crave, a velvety filling swirled with homemade strawberry sauce, and a glossy strawberry topping that’s almost too pretty to cut.
Those vibrant, ruby-red swirls against the pale, creamy backdrop transform this strawberry cheesecake into a show-stopping dessert that’s as beautiful as it is delicious.

The smooth texture, the bright pop of fresh strawberries, and the buttery crunch of the crust all come together in one heavenly bite, it’s pure dessert bliss.
Our easy strawberry swirl cheesecake recipe makes one irresistible 9-inch dessert, about 12 generous slices, perfect for birthdays, casual potlucks, or special holiday gatherings like Thanksgiving and Christmas.
Best of all, this strawberry swirl cheesecake is the kind of dessert that always draws compliments, one bite in, and everyone’s asking for seconds (and the recipe!).
The smiles and praise make every bit of effort so worth it, and trust me, you’ll be proud to serve it every single time.
✅ Read the entire article to ensure you’re fully prepared with all the necessary equipment and ingredients. The full recipe and baking instructions are below.

Key Ingredients for This Strawberry Swirl Cheesecake
Here are the main ingredients for this strawberry swirl cheesecake recipe:
1. For the Strawberry Swirl
- Fresh Strawberries: Opt for ripe, fragrant berries. Their natural sweetness and vibrant color are crucial for the best flavor and visual appeal of the strawberry topping for cheesecake.
- Granulated Sugar: This sweetens the strawberries and helps to draw out their natural juices during cooking, contributing to a rich, jammy consistency.
- Cornstarch: This acts as a thickening agent, ensuring the strawberry swirl holds its beautiful shape and consistency within the creamy cheesecake filling.
- Pure Vanilla Extract: A touch of vanilla provides a lovely aromatic depth, complementing the bright fruitiness of the strawberries.
- Fresh Lemon Juice: While optional, a squeeze of fresh lemon juice brightens the strawberry flavor and helps to maintain its vibrant red color, preventing it from dulling during cooking.
2. For the Graham Cracker Crust
- Graham Cracker Crumbs: These crumbs must be finely crushed for a cohesive and stable crust. A food processor is highly recommended for achieving the desired fine texture, avoiding large chunks that could cause the crust to crumble.
- Granulated Sugar: Adds a subtle sweetness to the crust, balancing the richness of the strawberry cheesecake filling.
- Kosher Salt: A pinch of salt enhances the flavor of the crust and provides a crucial balance to the sweetness.
- Unsalted Butter, Melted: This is the binder that holds the graham cracker crumbs together, creating a rich, buttery foundation for the strawberry swirl cheesecake.
3. For the Cheesecake Filling
- Full-Fat Cream Cheese: This ingredient is non-negotiable for achieving the signature creamy, rich, and dense texture of a classic baked strawberry cheesecake and must be at room temperature to ensure smooth blending and prevent lumps.
- Granulated Sugar: Provides the ideal level of sweetness for the rich cream cheese base, creating a balanced flavor profile.
- Full-Fat Sour Cream (or Heavy Whipping Cream): This adds a beautiful tang and essential moisture, enhancing the strawberry cheesecake’s tender crumb. Like the cream cheese, it must be at room temperature.
- Pure Vanilla Extract: A generous amount of vanilla extract provides a classic, comforting aromatic note that complements the dairy and fruit flavors.
- Large Eggs: Eggs are the primary binders, bringing the filling together. Room temperature eggs blend in more easily to prevent overmixing.
- Kosher Salt: A small pinch of salt works wonders to enhance all the other flavors, preventing the strawberry swirl cheesecake from tasting flat and bringing out the best in each ingredient.

Equipment You’ll Need for This Strawberry Swirl Cheesecake Recipe
Here’s a list of essential kitchen equipment you’ll need to make this strawberry cheesecake:
- 9-inch Springform Pan: This is an indispensable tool for cheesecake baking. Its unique design with removable sides allows for easy release of the delicate, custard-like dessert without damaging its beautiful structure, ensuring a pristine presentation.
- Large Roasting Pan: Essential for creating the water bath (bain-marie). The water bath provides steam and gentle, even heat for the cheesecake, which is critical for preventing cracks and achieving a perfectly creamy texture.
- Electric Mixer (Stand or Handheld): Crucial for achieving a smooth, lump-free cream cheese filling. A stand mixer offers hands-free convenience, but a good-quality handheld mixer works perfectly well for this strawberry cheesecake recipe.
- Food Processor (optional, but highly recommended): While graham crackers can be crushed by hand, a food processor ensures uniformly fine crumbs. This fine texture is key for a cohesive and stable crust that holds together beautifully.
- Medium Saucepan: Used for simmering the fresh strawberries to create the vibrant, delicious strawberry topping for cheesecake.
- Blender or Immersion Blender: Necessary for pureeing the cooked strawberries into a silky-smooth consistency, which is vital for creating the elegant swirls.
- Rubber Spatula: An indispensable tool for efficiently scraping down the sides of the mixing bowl. This ensures all ingredients are thoroughly incorporated without the need for overmixing, which is crucial for cheesecake batter.
- Thin Knife or Toothpick: These serve as the artistic tools for creating those beautiful, mesmerizing strawberry swirls on top of the cheesecake, allowing for precise and delicate patterns.
- Heavy-Duty Aluminum Foil: Essential for securely wrapping the springform pan to create a watertight barrier when utilizing a water bath. This prevents any water from seeping into the crust and making it soggy.
- Wire Cooling Rack: Provides proper air circulation around the cheesecake, allowing it to cool evenly after being removed from the oven. This gradual cooling is vital for preventing cracks.

Quick Tips for the Best Baked Strawberry Swirl Cheesecake
These simple tips will help your strawberry swirl cheesecake turn out perfect every single time:
1. Room Temperature is Non-Negotiable
- Always ensure all dairy products and eggs (cream cheese, sour cream, eggs) are at room temperature.
- This is the single most important tip for achieving a smooth, lump-free batter and directly helps prevent overmixing.
2. Do Not Overmix
- Especially after the eggs have been added. Mix on low speed, just until the ingredients are combined.
- Excess air incorporated into the batter leads to cracks in the finished cheesecake.
3. Use a Water Bath
- Utilize a water bath for even, moist baking. This method is crucial for preventing cracks and achieving a creamy texture.
- Always remember to securely wrap the springform pan with foil to prevent water seepage.
4. No Peeking
- Resist the urge to open the oven door during the baking process.
- Consistent, undisturbed heat is vital for an even bake and to prevent cracks that can result from sudden temperature changes.
5. Cool Slowly
- Allow the cheesecake to cool gradually. This means first in the turned-off oven, then at room temperature, before finally refrigerating.
- This gradual cooling process prevents thermal shock and minimizes the risk of cracking.
6. Chill Thoroughly
- Overnight chilling (6 to 24 hours) is absolutely crucial.
- This extended period allows the cheesecake to fully set, develop its rich flavor, and achieve that perfect, dense, creamy texture that makes it easy to slice cleanly.
7. Use Full-Fat Ingredients
- For the best, creamiest, and most stable texture, consistently use full-fat cream cheese and sour cream.
8. Fine Crust Crumbs
- Process graham crackers until they are very fine crumbs.
- This prevents a crumbly crust and ensures it holds together well, providing a solid foundation.
9. Swirl Gently
- When creating the strawberry swirl, a light hand is best.
- A few gentle passes with a thin knife or toothpick are sufficient to create a beautiful marble effect without overmixing or disturbing the delicate batter.

Final Remarks
Making this baked strawberry swirl cheesecake isn’t just about following a recipe, it’s about slowing down and enjoying the process.
From swirling that fresh strawberry sauce to watching it bake gently in the oven, it’s the kind of dessert that reminds you why homemade always feels so special.
Little things matter here, using room temperature cream cheese, wrapping that pan so your crust stays crisp, trusting the jiggle test instead of poking and prodding.
They’re simple details, but they make the difference between a good cheesecake and one that’s truly unforgettable.
I hope this strawberry cheesecake recipe helps you create a dessert you’re proud of, one you’ll come back to again and again, and always be excited to share.
Happy baking.

Best Baked Strawberry Swirl Cheesecake
This easy strawberry swirl cheesecake recipe makes one creamy 9-inch cheesecake with a crisp graham cracker crust, rich filling, fresh strawberry swirl, and glossy topping.
Ingredients
For the Strawberry Swirl
For the Graham Cracker Crust
For the Cheesecake Filling
Step-by-Step Instructions
Prepare the Strawberry Swirl
Prepare the Berries
- Begin by hulling and dicing the fresh strawberries.
- The goal is to have them small enough to break down easily during cooking, ensuring a smooth puree later.
Gently Simmer
- In a medium saucepan, combine the diced strawberries, granulated sugar, and fresh lemon juice (if using).
- Cook this mixture over medium heat, stirring occasionally.
- As the strawberries soften, they will release their juices and transform into a beautifully jammy consistency.
- This process typically takes approximately 8 to 12 minutes.
Thicken It Up
- While the strawberries are simmering, whisk together the cornstarch and water in a small bowl until a smooth slurry forms.
- Once the strawberries are sufficiently soft and jammy, slowly pour this cornstarch slurry into the saucepan, stirring continuously.
- Continue to cook for an additional 1 to 2 minutes, allowing the mixture to thicken to a lovely, syrupy consistency.
- This thickened mixture forms the exquisite strawberry topping for cheesecake.
Puree to Perfection
- Remove the saucepan from the heat and allow the strawberry mixture to cool slightly.
- Carefully transfer it to a blender or use an immersion blender to puree it until it is completely smooth.
- This step is crucial for achieving a silky, uniform swirl.
Add Vanilla & Chill
- Stir in the pure vanilla extract.
- A critical step at this juncture is to allow the strawberry puree to cool completely to room temperature, or even better, chill it in the refrigerator until it is cool to the touch.
- This cooling helps maintain its consistency and prevents it from thinning out excessively when swirled into the cheesecake batter.
Make the Graham Cracker Crust
Preheat the Oven
- Preheat the oven to 350°F (175°C).
- This temperature is ideal for setting the crust.
Create the Crumb
- In a medium mixing bowl, combine the finely crushed graham cracker crumbs, granulated sugar, and kosher salt.
- If the crumbs are not sufficiently fine, a quick pulse in a food processor is recommended to achieve a sandy texture rather than chunky bits.
Mix in the Butter
- Pour the melted unsalted butter into the crumb mixture.
- Mix thoroughly with a fork until all the crumbs are evenly moistened and resemble wet sand.
- When a small portion is pinched between the fingers, it should hold together.
Press the Crust
- Transfer the buttery crumbs into a 9-inch springform pan.
- With fingers, carefully press the mixture firmly into the bottom of the pan and approximately 3/4 to 1 inch up the sides.
- It is important to ensure the crust extends up the sides and covers the seam where the bottom meets the sides of the pan; this helps prevent leaks, especially if a water bath is used.
- For an even and compact base, use the bottom of a flat-bottomed measuring cup to firmly pack the crumbs down.
Pre-Bake the Crust
- Bake the prepared crust for 8 to 10 minutes, or until it appears golden brown and emits a fragrant aroma.
- This crucial step sets and seals the crust, preventing it from becoming soggy once the wet cheesecake filling is added.
Cool Completely
- Immediately after removing the crust from the oven, use a clean, dry measuring cup to gently press the crust down one more time to ensure it is compact.
- Then, allow it to cool completely on a wire rack before proceeding to fill it.
- Patience at this stage is key to a perfectly crisp crust.
Make the Silky Cheesecake Filling
Bring Ingredients to Room Temperature
- Before beginning, confirm that the full-fat cream cheese, sour cream, and eggs are truly at room temperature.
- This is the fundamental secret to achieving a lump-free, velvety smooth filling.
- Cold ingredients will resist blending, leading to a lumpy texture and increasing the likelihood of overmixing.
Beat the Cream Cheese and Sugar
- In a large mixing bowl, using an electric mixer (either a stand mixer with a paddle attachment or a handheld mixer), beat the softened cream cheese and granulated sugar together on medium speed.
- Continue beating until the mixture is incredibly smooth and creamy, with no lumps visible.
- Remember to scrape down the sides of the bowl several times to ensure all ingredients are thoroughly incorporated.
Add Sour Cream and Vanilla
- Reduce the mixer speed to low.
- Add the sour cream, pure vanilla extract, and kosher salt.
- Mix gently until these ingredients are just combined and fully incorporated.
- Again, scrape down the sides of the bowl to ensure uniformity.
Add Eggs One at a Time
- This is the most critical stage for the filling.
- Add the large eggs one at a time.
- Beat on low speed just until each egg is combined into the batter before adding the next.
- It is paramount not to overmix the filling after the eggs have been added.
- Overmixing incorporates too much air into the batter, which causes the cheesecake to puff up excessively during baking and then fall and crack dramatically upon cooling.
- The objective is a dense, creamy cheesecake, not an airy cake.
Remove Air Bubbles
- Once the filling is prepared, gently tap the springform pan containing the crust a few times on the counter.
- This action helps to release any large air bubbles that may have become trapped in the batter, contributing to a smoother surface on the finished cheesecake.
Swirling Your Cheesecake
Layer the Base
- Carefully pour approximately half of the silky cheesecake filling over the completely cooled graham cracker crust in the springform pan.
Add the First Strawberry Swirl
- Gently spoon about half of the chilled strawberry puree (the strawberry topping for cheesecake) in dollops over this initial layer of filling.
Create the Swirl
- Now comes the artistic part.
- Take a thin knife or a toothpick.
- Gently drag it through the strawberry puree and cheesecake filling to create beautiful, marbled swirls.
- Do not overdo it; a few gentle passes are sufficient to marbleize the batter slightly.
- The aim is a marbled effect, not a fully mixed one.
Add the Top Layer
- Carefully pour the remaining cheesecake batter into the pan, gently spreading it to cover the first swirl layer.
Finish with the Final Swirl
- Spoon the remaining strawberry sauce over the top of the cheesecake batter.
- Repeat the swirling process with the knife or toothpick, creating a stunning design on the surface.
- The consistency of the strawberry puree is important here; if it is too thin, it might sink or bleed excessively, while if too thick, it might not swirl well.
- A technique that can aid in achieving a beautiful and stable swirl is to mix a small amount of the cheesecake batter with the strawberry component.
- This helps to equalize the densities of the two components, allowing the strawberry to suspend and swirl more effectively without sinking or creating uneven pockets that could potentially lead to structural weaknesses or cracking during baking.
Bake Your Strawberry Cheesecake
Set Up the Water Bath
- The water bath is a critical component for achieving a crack-free, creamy strawberry cheesecake.
- Boil approximately 2 quarts of water.
- Place a large roasting pan (such as a 9x13-inch baking dish) on the bottom rack of the preheated oven.
- If the springform pan is not water-tight (which many are not!), tightly wrap the bottom and sides with 2 to 3 layers of heavy-duty aluminum foil to create a barrier and prevent any water from seeping in.
Position the Cheesecake and Water Bath
- Carefully place the foil-wrapped springform pan containing the strawberry cheesecake onto the middle rack of the oven, directly above the roasting pan.
- Then, carefully pour the boiling water into the roasting pan on the bottom rack, filling it to a depth of about 1 inch.
Bake in Two Stages
- Bake the cheesecake at 350°F (175°C) for the initial 15 minutes.
- This higher temperature helps to set the edges of the cheesecake.
- Following this, reduce the oven temperature to 300°F (150°C) and continue baking for an additional 50 to 60 minutes.
Check for Doneness
- It is crucial to resist the urge to open the oven door during baking, as consistent heat is vital for an even bake and to prevent cracks.
- The strawberry swirl cheesecake is considered done when its edges are set and slightly puffed, perhaps just beginning to show a hint of browning.
- The center, however, should still exhibit a slight "jiggle" when the side of the pan is gently tapped.
- It will not be completely firm at this stage, which is perfectly normal; it will continue to set as it cools.
Cool Your Strawberry Cheesecake
Cool in the Oven
- Once the baking time is complete and the characteristic jiggle has been confirmed, turn off the oven.
- This is another crucial step in preventing cracks: leave the cheesecake inside the oven, but prop the oven door open a few inches.
- Allowing it to cool gradually in the oven for 1 hour prevents thermal shock and enables the strawberry cheesecake to settle gently.
Cool to Room Temperature
- After an hour in the oven, carefully remove the cheesecake and place it on a wire cooling rack on the counter.
- Allow it to cool completely to room temperature, which can take an additional 1 to 2 hours.
Chill Overnight
- Once fully cooled to room temperature, loosely cover the cheesecake tightly with aluminum foil.
- Transfer it to the refrigerator to chill for a minimum of 6 hours, but ideally overnight (8 to 24 hours).
- This extended chilling period is essential for the cheesecake to fully set, firm up, develop its rich flavor, and achieve that perfect, dense, creamy texture.
- Rushing this step will compromise the final result.
Unmold, Slice, and Serve
Unmold the Strawberry Cheesecake
- After its long, patient chill, the baked strawberry swirl cheesecake is ready for its grand reveal.
- Run a thin, sharp knife around the outer edge of the cheesecake, between the crust and the pan, to ensure it is loosened.
- Then, gently release and remove the springform ring.
Slice & Serve
- For beautifully clean slices, use a sharp, thin-bladed knife.
- For each cut, dip the knife in hot water and wipe it dry.
- This technique helps the knife glide smoothly through the creamy texture without sticking or tearing.
- Garnish with fresh strawberries or a dollop of whipped cream as desired.

Nutrition Facts
Servings 12
Serving Size Approximately 110g per slice
- Amount Per Serving
- Calories 330kcal
- % Daily Value *
- Total Fat 19.5g30%
- Saturated Fat 10.7g54%
- Trans Fat 0.25g
- Cholesterol 57.5mg20%
- Sodium 185mg8%
- Potassium 98mg3%
- Total Carbohydrate 33.5g12%
- Dietary Fiber 1g4%
- Sugars 24g
- Protein 5g10%
- Vitamin A 2.5 IU
- Vitamin C 11 mg
- Calcium 53 mg
- Iron 0.75 mg
* Percent Daily Values are based on a 2,000 calorie diet. Your daily value may be higher or lower depending on your calorie needs.
Note
- Bring cream cheese, sour cream, and eggs to room temperature for a smooth, lump-free batter and to help prevent overmixing.
- Press the graham cracker crust very firmly, especially up the sides, to create a leak-proof barrier and stable base.
- After adding eggs, mix the filling gently on the lowest speed just until combined to avoid incorporating excess air that causes cracks.
- Always wrap the springform pan securely in 2–3 layers of heavy-duty foil before the water bath to prevent leaks and a soggy crust.
- Trust the slight jiggle in the cheesecake center as the doneness sign; overbaking leads to dryness, crumbling, and cracks.


